
My name is Jordan Ramirez, and as a Field Superintendent for A1M Construction, I’ve seen my share of home improvement projects that started with a homeowner’s simple wish: “I just want this to look better and last.” That’s exactly what the Miller family in Wiggins told me when they called us this past September. The cooling nights were a reminder that winter was on its way, and the last thing they wanted was to head into the colder months worrying about their master bathroom floor.
Their home, a classic 1950s ranch-style house, had great bones but was showing its age in a few key areas. The bathroom floor was the biggest concern. What was once likely a proud feature of the home was now a source of daily frustration. The old sheet vinyl was peeling at the corners, and a few hairline cracks had developed near the bathtub. It wasn't just an eyesore; the Millers were worried about what might be happening underneath. They knew they needed a professional Wiggins bathroom tile floor replacement, and they wanted it done right before the first snow could complicate things.
The Assessment
When I arrived for the initial inspection, the problem was immediately apparent. The vinyl flooring felt brittle and uneven underfoot. Near the base of the toilet and along the edge of the tub, the discoloration was a tell-tale sign that small amounts of water had been seeping through the cracks for some time. This is a common issue in homes of this era, where the original flooring materials have simply reached the end of their service life.
After getting the homeowners’ permission to peel back a corner of the vinyl, my suspicions were confirmed. The original builders had installed the flooring directly over a single layer of plywood subfloor. While standard for the 1950s, this method offers little protection against the unique environmental stresses we see here in Wiggins. The dry climate and seasonal humidity swings on the Colorado plains cause wood to expand and contract. Without a proper buffer, that movement gets transferred directly to the flooring, causing cracks, gaps, and eventual failure. This is why a proper underlayment for tile floor Colorado plains is not a luxury - it's a necessity for a lasting job.
My assessment for the Millers was direct: a simple cover-up job wouldn't solve the underlying issue. To give them the durable, beautiful, and worry-free floor they wanted, we needed to go deeper. We needed a full demolition and a modern, professional bathroom tile installation that accounted for our local conditions. I walked them through what my team at A1M Construction would do, explaining how we would build a floor system designed for longevity, not just for looks.
Our Solution
Once the Millers gave us the green light, my team from A1M Construction got to work immediately. Our approach is always methodical, ensuring no corners are cut.
Step 1: Demolition and Subfloor Preparation Our first task was to carefully demolish and remove the old vinyl and the compromised plywood layer beneath it. As we suspected, we found a small, localized area of moisture damage on the main structural subfloor right next to the tub. This is exactly the kind of hidden problem that can turn into a major structural issue if ignored. We cut out the soft, damaged wood and replaced it with new, pressure-treated plywood, ensuring the foundation for our new floor was solid, level, and sound.
Step 2: Installing the Uncoupling Membrane This was the most critical step in ensuring the project’s long-term success. Instead of tiling directly onto the wood subfloor, we installed a modern uncoupling membrane. This waterproof, grid-patterned membrane acts as a flexible buffer between the subfloor and the new tile. It effectively “uncouples” the tile from the wood, allowing the subfloor to expand and contract naturally with temperature and humidity changes without transferring that stress to the tile and grout. This single step is the key to preventing cracks and ensuring a durable floor in our climate.
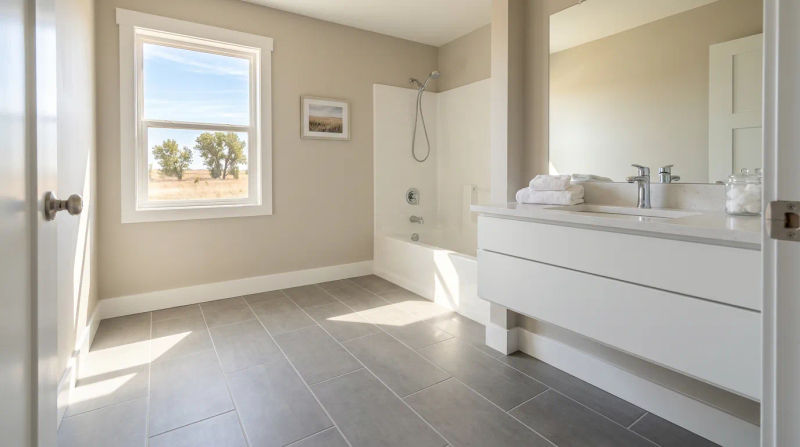
Step 3: Tile Layout and Installation With the foundation perfectly prepared, we moved on to the main event: the bathroom tile installation. The homeowners had chosen a beautiful, durable 12x24 inch porcelain tile with a subtle stone texture. To ensure a high-end, professional finish, we spent extra time on the tile layout and grout lines Wiggins. We started our grid from the center of the room, which guarantees that the tiles along every wall are evenly cut and visually balanced. It’s a detail that separates an amateur job from a professional one.
My crew used a high-quality, polymer-modified thin-set mortar to bond the tiles to the membrane, ensuring maximum adhesion. Each tile was carefully set and leveled. It’s a painstaking process, but it’s what we at A1M Construction pride ourselves on. The result is a perfectly flat surface with no lippage.
Step 4: Grouting and Sealing After the mortar cured, we applied a high-performance, stain-resistant grout in a complementary color. This type of grout is essential for a wet area like a bathroom, as it resists moisture, mold, and mildew. The final step was to clean and polish the tiles and apply a silicone sealant around the perimeter - at the tub, toilet, and vanity - to create a completely waterproof seal.
Throughout the four-day project, I was on-site, overseeing the work and keeping the Millers updated. That’s the A1M Construction difference; as a Field Superintendent, I’m personally invested in the quality of every job we do.
The Results
The transformation was stunning. The bathroom went from dated and worrisome to modern, clean, and solid. The “before” was a floor with peeling corners, cracked lines, and a constant sense of uncertainty. The “after” is a floor that feels absolutely rock-solid underfoot, with flawless grout lines and a sophisticated finish that completely elevates the space.
The Millers were overjoyed. They told me the best part wasn’t just how great it looked, but the peace of mind they now had. They no longer flinch when a little water splashes out of the tub, because they know they have a fully waterproof system protecting their home's structure. They love the clean, tight grout lines and the perfectly level surface, details they said they would never have achieved on their own.
We didn't just give them a new floor; we provided a permanent solution. By addressing the root cause of the original floor's failure - the subfloor movement - we delivered a project that adds significant value and durability to their home. This is the standard of excellence we strive for on every A1M Construction project.
Conclusion
A successful remodeling project, especially something as foundational as a tile floor, is about more than just new materials. It’s about understanding the home, the local environment, and applying the right techniques to ensure the work lasts a lifetime. For the Miller family in Wiggins, we were able to turn a point of stress into a source of pride.
If your home has a problem area that you've been putting off, don't wait for it to become a bigger issue. Let us bring our expertise and commitment to quality to your next project.
Ready for your own A1M Construction experience? Contact us today for a free inspection.